Investigate all the energy resources used at your school. Tick (✓) the box(es). If you use electricity, find out how the power plant works. For example, is it a nuclear or coal power station? If you tick ‘other’, write the resource in the box.
Use the following rating scale and criteria to rate your school’s energy resources:
• Availability (Score 1 for poor and 5 for excellent.)
• Reliability (Score 1 for extremely unreliable and 5 for extremely reliable.)
• Cost (Score 1 for very expensive and 5 for extremely affordable.)
• Environmental impact (Score 1 for very high and 5 for very low impact.)
An example has been done for you.
| Energy resource | Availability | Reliability | Cost | Environmental impact |
|---|---|---|---|---|
| Electricity | 5: Plentiful | 5: Reliable, as it is from the main grid | 2: Expensive, charged per unit; the electricity bill of the entire school is high every month | 1: This energy comes from a coal power station, so there is an increase in the emission of greenhouse gases and other air pollutants, which speeds up climate change |
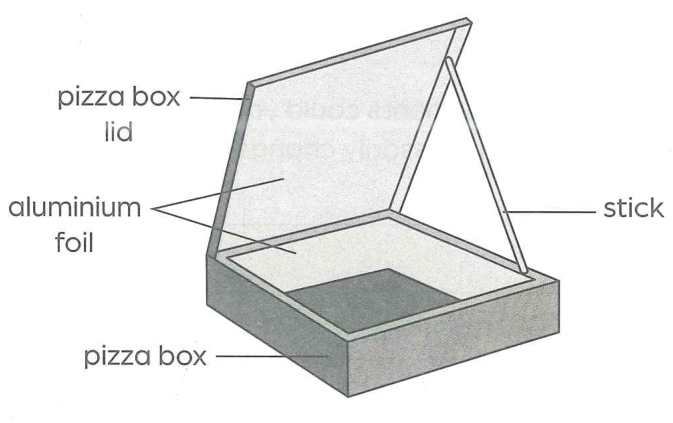
**Solar-cooker investigation.** Work outdoors on a sunny day (a suitable heating device may be used instead). Materials: a pizza box, aluminium foil, two small plates, two of the same quantity of food to melt (such as chocolate or ice), long sticks, a stopwatch, black cardboard or black paper, plastic film, sticky tape, scissors or a cutter.
1. Open the pizza box. Cover all the inside walls and the inner part of the lid with aluminium foil.
2. Place a small plate with the food inside the box. Use sticks to keep the lid from closing. Move the lid back and forth until you have the correct angle for maximum reflection. Use the stick to hold the lid in position. Set the stopwatch and measure how long it takes for the food to start melting and then to fully melt.
3. Cover the bottom of the box with black cardboard. Place another plate with food to melt on top. Then, cover the box with plastic film, secure it with tape and place it in direct sunlight. Remember to adjust the lid so that the angle guarantees maximum reflection.
Set the stopwatch and measure how long it takes for the food to start melting and then to fully melt. Record the times in the table.
5. Start the stopwatch. Measure how long it takes for the food to melt. Record it in the table.
| Setup | Time for food to start melting | Time for food to fully melt |
|---|---|---|
| Pizza box with aluminium foil only | | |
| Pizza box with black cardboard, aluminium foil and plastic film | | |
**Solar-cooker investigation.** Work outdoors on a sunny day (a suitable heating device may be used instead). Materials: a pizza box, aluminium foil, two small plates, two of the same quantity of food to melt (such as chocolate or ice), long sticks, a stopwatch, black cardboard or black paper, plastic film, sticky tape, scissors or a cutter.
1. Open the pizza box. Cover all the inside walls and the inner part of the lid with aluminium foil.
2. Place a small plate with the food inside the box. Use sticks to keep the lid from closing. Move the lid back and forth until you have the correct angle for maximum reflection. Use the stick to hold the lid in position. Set the stopwatch and measure how long it takes for the food to start melting and then to fully melt.
3. Cover the bottom of the box with black cardboard. Place another plate with food to melt on top. Then, cover the box with plastic film, secure it with tape and place it in direct sunlight. Remember to adjust the lid so that the angle guarantees maximum reflection.
Predict whether the investigation will have a different outcome after these changes are applied.
**Solar-cooker investigation.** Work outdoors on a sunny day (a suitable heating device may be used instead). Materials: a pizza box, aluminium foil, two small plates, two of the same quantity of food to melt (such as chocolate or ice), long sticks, a stopwatch, black cardboard or black paper, plastic film, sticky tape, scissors or a cutter.
1. Open the pizza box. Cover all the inside walls and the inner part of the lid with aluminium foil.
2. Place a small plate with the food inside the box. Use sticks to keep the lid from closing. Move the lid back and forth until you have the correct angle for maximum reflection. Use the stick to hold the lid in position. Set the stopwatch and measure how long it takes for the food to start melting and then to fully melt.
3. Cover the bottom of the box with black cardboard. Place another plate with food to melt on top. Then, cover the box with plastic film, secure it with tape and place it in direct sunlight. Remember to adjust the lid so that the angle guarantees maximum reflection.
Was there a difference in the melting times? Why do you think this was the case?
**Solar-cooker investigation.** Work outdoors on a sunny day (a suitable heating device may be used instead). Materials: a pizza box, aluminium foil, two small plates, two of the same quantity of food to melt (such as chocolate or ice), long sticks, a stopwatch, black cardboard or black paper, plastic film, sticky tape, scissors or a cutter.
1. Open the pizza box. Cover all the inside walls and the inner part of the lid with aluminium foil.
2. Place a small plate with the food inside the box. Use sticks to keep the lid from closing. Move the lid back and forth until you have the correct angle for maximum reflection. Use the stick to hold the lid in position. Set the stopwatch and measure how long it takes for the food to start melting and then to fully melt.
3. Cover the bottom of the box with black cardboard. Place another plate with food to melt on top. Then, cover the box with plastic film, secure it with tape and place it in direct sunlight. Remember to adjust the lid so that the angle guarantees maximum reflection.
Was this a fair test? Explain your reasoning. If it wasn't, discuss why the conclusions drawn from this investigation might still be valid.
**Solar-cooker investigation.** Work outdoors on a sunny day (a suitable heating device may be used instead). Materials: a pizza box, aluminium foil, two small plates, two of the same quantity of food to melt (such as chocolate or ice), long sticks, a stopwatch, black cardboard or black paper, plastic film, sticky tape, scissors or a cutter.
1. Open the pizza box. Cover all the inside walls and the inner part of the lid with aluminium foil.
2. Place a small plate with the food inside the box. Use sticks to keep the lid from closing. Move the lid back and forth until you have the correct angle for maximum reflection. Use the stick to hold the lid in position. Set the stopwatch and measure how long it takes for the food to start melting and then to fully melt.
3. Cover the bottom of the box with black cardboard. Place another plate with food to melt on top. Then, cover the box with plastic film, secure it with tape and place it in direct sunlight. Remember to adjust the lid so that the angle guarantees maximum reflection.
What adjustments could you make to this investigation to ensure a fairer test? Would these changes necessarily change your overall conclusion? Why or why not?
**Solar-cooker investigation.** Work outdoors on a sunny day (a suitable heating device may be used instead). Materials: a pizza box, aluminium foil, two small plates, two of the same quantity of food to melt (such as chocolate or ice), long sticks, a stopwatch, black cardboard or black paper, plastic film, sticky tape, scissors or a cutter.
1. Open the pizza box. Cover all the inside walls and the inner part of the lid with aluminium foil.
2. Place a small plate with the food inside the box. Use sticks to keep the lid from closing. Move the lid back and forth until you have the correct angle for maximum reflection. Use the stick to hold the lid in position. Set the stopwatch and measure how long it takes for the food to start melting and then to fully melt.
3. Cover the bottom of the box with black cardboard. Place another plate with food to melt on top. Then, cover the box with plastic film, secure it with tape and place it in direct sunlight. Remember to adjust the lid so that the angle guarantees maximum reflection.
Discuss how solar energy can be used to improve the quality of life of people in areas with few economic resources. How can it contribute to protecting the environment?
**Solar-cooker investigation.** Work outdoors on a sunny day (a suitable heating device may be used instead). Materials: a pizza box, aluminium foil, two small plates, two of the same quantity of food to melt (such as chocolate or ice), long sticks, a stopwatch, black cardboard or black paper, plastic film, sticky tape, scissors or a cutter.
1. Open the pizza box. Cover all the inside walls and the inner part of the lid with aluminium foil.
2. Place a small plate with the food inside the box. Use sticks to keep the lid from closing. Move the lid back and forth until you have the correct angle for maximum reflection. Use the stick to hold the lid in position. Set the stopwatch and measure how long it takes for the food to start melting and then to fully melt.
3. Cover the bottom of the box with black cardboard. Place another plate with food to melt on top. Then, cover the box with plastic film, secure it with tape and place it in direct sunlight. Remember to adjust the lid so that the angle guarantees maximum reflection.
Global warming is caused by the greenhouse effect. Use the solar oven as an analogy to explain the reason why temperatures on Earth are rising.
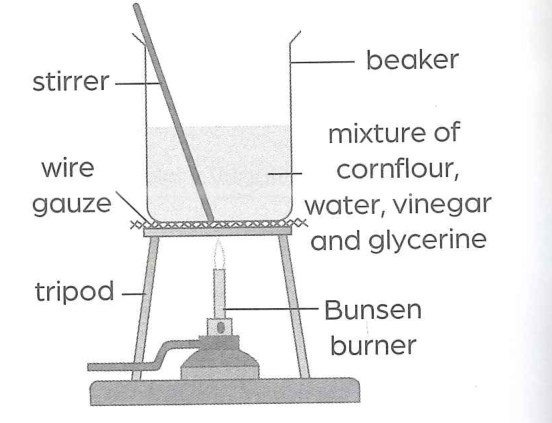
**Making bioplastic.** Materials: safety goggles, 40 cm³ water, 10 g cornflour, a beaker, 5 cm³ glycerine, 5 cm³ vinegar, a Bunsen burner, a stirrer, a pair of tongs, baking paper or a tray.
Mix the water and cornflour in the beaker. Add glycerine and vinegar. Warm the mixture on the burner while stirring. After 10 minutes, the mixture will be sticky, thick and translucent. Remove it from the heat and spread it onto baking paper or a baking tray. Let it rest for at least 24 hours, then remove the bioplastic from the tray.
**Caution:** The mixture will be hot and sticky. Handle with care to avoid burns. Ask your teacher to check your safety precautions before carrying out the practical work.
Follow these instructions to make bioplastics. First, read the instructions and assess the risks of the procedure and the safety precautions you should take.
**Making bioplastic.** Materials: safety goggles, 40 cm³ water, 10 g cornflour, a beaker, 5 cm³ glycerine, 5 cm³ vinegar, a Bunsen burner, a stirrer, a pair of tongs, baking paper or a tray.
Mix the water and cornflour in the beaker. Add glycerine and vinegar. Warm the mixture on the burner while stirring. After 10 minutes, the mixture will be sticky, thick and translucent. Remove it from the heat and spread it onto baking paper or a baking tray. Let it rest for at least 24 hours, then remove the bioplastic from the tray.
**Caution:** The mixture will be hot and sticky. Handle with care to avoid burns. Ask your teacher to check your safety precautions before carrying out the practical work.
Remove the bioplastic from the tray. What do you observe?
**Making bioplastic.** Materials: safety goggles, 40 cm³ water, 10 g cornflour, a beaker, 5 cm³ glycerine, 5 cm³ vinegar, a Bunsen burner, a stirrer, a pair of tongs, baking paper or a tray.
Mix the water and cornflour in the beaker. Add glycerine and vinegar. Warm the mixture on the burner while stirring. After 10 minutes, the mixture will be sticky, thick and translucent. Remove it from the heat and spread it onto baking paper or a baking tray. Let it rest for at least 24 hours, then remove the bioplastic from the tray.
**Caution:** The mixture will be hot and sticky. Handle with care to avoid burns. Ask your teacher to check your safety precautions before carrying out the practical work.
Now that you have read the procedure and the caution box, are there any other safety precautions that should be added? For example, how should you handle the hot beaker full of the hot, sticky mixture?
**Making bioplastic.** Materials: safety goggles, 40 cm³ water, 10 g cornflour, a beaker, 5 cm³ glycerine, 5 cm³ vinegar, a Bunsen burner, a stirrer, a pair of tongs, baking paper or a tray.
Mix the water and cornflour in the beaker. Add glycerine and vinegar. Warm the mixture on the burner while stirring. After 10 minutes, the mixture will be sticky, thick and translucent. Remove it from the heat and spread it onto baking paper or a baking tray. Let it rest for at least 24 hours, then remove the bioplastic from the tray.
**Caution:** The mixture will be hot and sticky. Handle with care to avoid burns. Ask your teacher to check your safety precautions before carrying out the practical work.
Assess your bioplastic tray. What advantages does it have over a plastic tray?
**Making bioplastic.** Materials: safety goggles, 40 cm³ water, 10 g cornflour, a beaker, 5 cm³ glycerine, 5 cm³ vinegar, a Bunsen burner, a stirrer, a pair of tongs, baking paper or a tray.
Mix the water and cornflour in the beaker. Add glycerine and vinegar. Warm the mixture on the burner while stirring. After 10 minutes, the mixture will be sticky, thick and translucent. Remove it from the heat and spread it onto baking paper or a baking tray. Let it rest for at least 24 hours, then remove the bioplastic from the tray.
**Caution:** The mixture will be hot and sticky. Handle with care to avoid burns. Ask your teacher to check your safety precautions before carrying out the practical work.
What are the disadvantages of your bioplastic tray?
**Making bioplastic.** Materials: safety goggles, 40 cm³ water, 10 g cornflour, a beaker, 5 cm³ glycerine, 5 cm³ vinegar, a Bunsen burner, a stirrer, a pair of tongs, baking paper or a tray.
Mix the water and cornflour in the beaker. Add glycerine and vinegar. Warm the mixture on the burner while stirring. After 10 minutes, the mixture will be sticky, thick and translucent. Remove it from the heat and spread it onto baking paper or a baking tray. Let it rest for at least 24 hours, then remove the bioplastic from the tray.
**Caution:** The mixture will be hot and sticky. Handle with care to avoid burns. Ask your teacher to check your safety precautions before carrying out the practical work.
In groups, design a fair test to determine if your bioplastic tray is biodegradable. Write your hypothesis, materials and procedure.
**Making bioplastic.** Materials: safety goggles, 40 cm³ water, 10 g cornflour, a beaker, 5 cm³ glycerine, 5 cm³ vinegar, a Bunsen burner, a stirrer, a pair of tongs, baking paper or a tray.
Mix the water and cornflour in the beaker. Add glycerine and vinegar. Warm the mixture on the burner while stirring. After 10 minutes, the mixture will be sticky, thick and translucent. Remove it from the heat and spread it onto baking paper or a baking tray. Let it rest for at least 24 hours, then remove the bioplastic from the tray.
**Caution:** The mixture will be hot and sticky. Handle with care to avoid burns. Ask your teacher to check your safety precautions before carrying out the practical work.
Share your test with another group. Can your hypothesis be tested? Give feedback on how your investigation could be improved.