Question 10
Activity 2.1.1: A model of an atom
In this activity, you will build a model of an element.
You will need: scissors, hole punch, string, glue, card in different colours (white, red, grey, blue and another colour for the shells).
Method
1 Cut a white circle of card about 6 cm diameter. This will act as the base for the nucleus.
2 Cut out small red circles of about 1.5–2 cm diameter to represent the protons in your chosen element, and grey circles of about 1.5–2 cm diameter to represent the neutrons. Stick these onto one side of the nucleus. Repeat this step, but stick the protons and neutrons onto the other side of the nucleus. Make sure you have the correct number on both sides.
3 Cut out concentric rings of card to represent the electron shells. The rings should be about 2 cm wide. Concentric means circles of different radius sharing the same centre.
4 Cut out small blue circles to represent the electrons in your chosen element. Stick these onto one side of the relevant electron shell. Repeat this step, but stick the electrons onto the other side of each shell. Make sure you have the correct number of electrons on both sides.
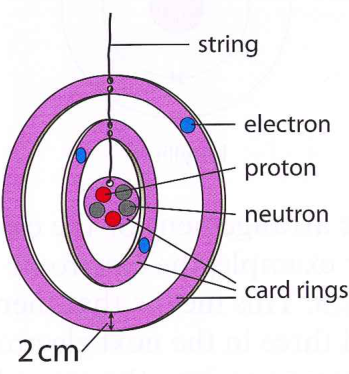
5 Assemble the model as shown in the diagram.
6 Make a label for your model that gives the name and symbol for your element, and the number of protons, neutrons and electrons. Hang the label from the bottom of your model.
In this activity, you will build a model of an element.
You will need: scissors, hole punch, string, glue, card in different colours (white, red, grey, blue and another colour for the shells).
Method
1 Cut a white circle of card about 6 cm diameter. This will act as the base for the nucleus.
2 Cut out small red circles of about 1.5–2 cm diameter to represent the protons in your chosen element, and grey circles of about 1.5–2 cm diameter to represent the neutrons. Stick these onto one side of the nucleus. Repeat this step, but stick the protons and neutrons onto the other side of the nucleus. Make sure you have the correct number on both sides.
3 Cut out concentric rings of card to represent the electron shells. The rings should be about 2 cm wide. Concentric means circles of different radius sharing the same centre.
4 Cut out small blue circles to represent the electrons in your chosen element. Stick these onto one side of the relevant electron shell. Repeat this step, but stick the electrons onto the other side of each shell. Make sure you have the correct number of electrons on both sides.
5 Assemble the model as shown in the diagram.
6 Make a label for your model that gives the name and symbol for your element, and the number of protons, neutrons and electrons. Hang the label from the bottom of your model.