Question 50
How do plants and animals affect carbon dioxide concentration?
In this investigation, you are going to think about two processes that you have learnt about – respiration and photosynthesis – and how they affect the concentration of carbon dioxide.
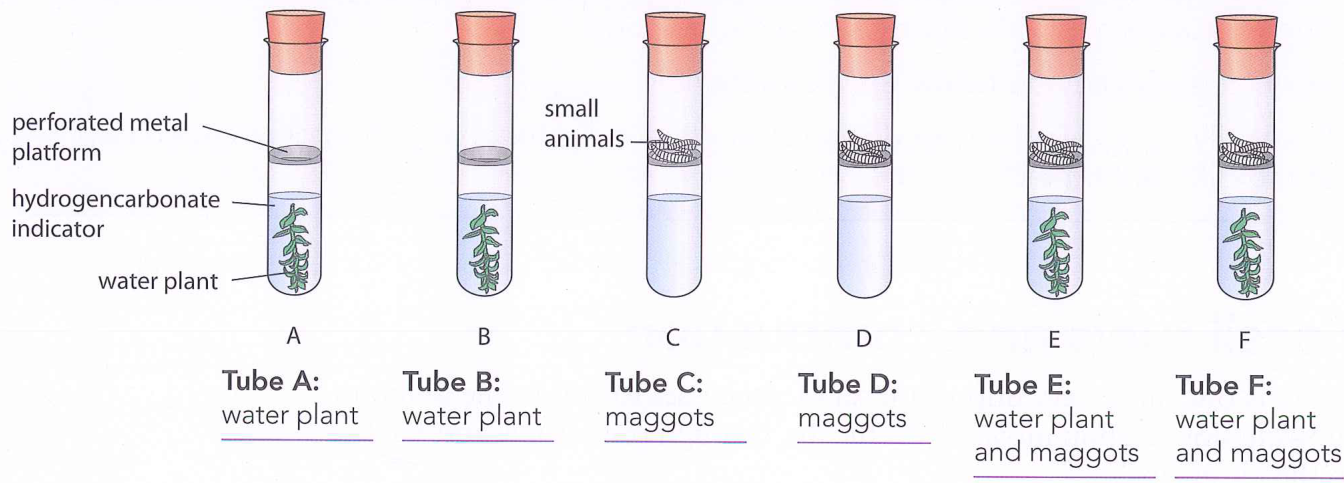
You will need: six clean test tubes, and a beaker or rack to stand them in, rubber bungs to fit the test tubes, small pieces of perforated metal (e.g. zinc gauze) to make platforms inside the tubes (see the diagram), some small pieces of water plant, some small animals such as maggots (fly larvae) or woodlice, blunt forceps (tweezers) for handling the plants and small animals, some black paper and sticky tape, some hydrogencarbonate indicator solution.
Note: The animals did not volunteer to be part of your experiment. Treat them with care. After the experiment is finished, put the animals back into their container, or a safe place outside.
Hydrogencarbonate indicator solution is a liquid that changes colour depending on the concentration of carbon dioxide. The colours are:
- purple when there is no carbon dioxide
- red when there is a low concentration of carbon dioxide
- yellow when there is a higher concentration of carbon dioxide.
Method
1 Label the tubes A, B, C, D, E and F.
2 Use the pieces of perforated metal to make small platforms that can fit inside the tubes. The platforms will stop the animals from falling into the liquid.
3 Take the platforms out of the tubes. Pour about 3 cm depth of hydrogencarbonate indicator into each tube.
4 Put a piece of water plant into the indicator in tubes A, B, E and F.
5 Put the platforms back into the tubes. Try to make them level, with each one at approximately the same position in each tube.
6 Carefully place animals on the platforms in tubes C, D, E and F and fit the bungs.
7 Record the colour of the hydrogencarbonate indicator in each tube.
8 Now wrap black paper around tubes A, C and E, so that no light can get in.
9 Leave all the tubes in the same place for at least 30 minutes. (It is even better if you can set your experiment up in the morning, and then check it in the afternoon.)
10 Return to your tubes and take off the black paper. Record the colour of the indicator in each tube.
In this investigation, you are going to think about two processes that you have learnt about – respiration and photosynthesis – and how they affect the concentration of carbon dioxide.
You will need: six clean test tubes, and a beaker or rack to stand them in, rubber bungs to fit the test tubes, small pieces of perforated metal (e.g. zinc gauze) to make platforms inside the tubes (see the diagram), some small pieces of water plant, some small animals such as maggots (fly larvae) or woodlice, blunt forceps (tweezers) for handling the plants and small animals, some black paper and sticky tape, some hydrogencarbonate indicator solution.
Note: The animals did not volunteer to be part of your experiment. Treat them with care. After the experiment is finished, put the animals back into their container, or a safe place outside.
Hydrogencarbonate indicator solution is a liquid that changes colour depending on the concentration of carbon dioxide. The colours are:
- purple when there is no carbon dioxide
- red when there is a low concentration of carbon dioxide
- yellow when there is a higher concentration of carbon dioxide.
Method
1 Label the tubes A, B, C, D, E and F.
2 Use the pieces of perforated metal to make small platforms that can fit inside the tubes. The platforms will stop the animals from falling into the liquid.
3 Take the platforms out of the tubes. Pour about 3 cm depth of hydrogencarbonate indicator into each tube.
4 Put a piece of water plant into the indicator in tubes A, B, E and F.
5 Put the platforms back into the tubes. Try to make them level, with each one at approximately the same position in each tube.
6 Carefully place animals on the platforms in tubes C, D, E and F and fit the bungs.
7 Record the colour of the hydrogencarbonate indicator in each tube.
8 Now wrap black paper around tubes A, C and E, so that no light can get in.
9 Leave all the tubes in the same place for at least 30 minutes. (It is even better if you can set your experiment up in the morning, and then check it in the afternoon.)
10 Return to your tubes and take off the black paper. Record the colour of the indicator in each tube.