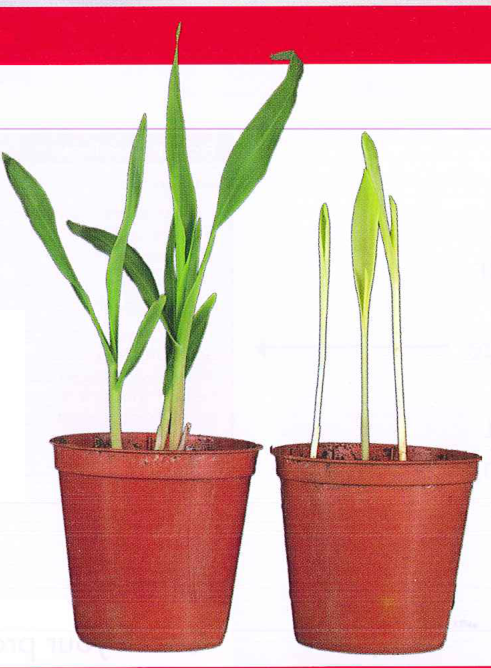
Look at the pictures of the young maize (corn) plants. The plants on the left have been given light, but the ones on the right have not had light. You may also be able to look at some actual plants that have been grown in the light and in the dark. With a partner, make a list of the differences you can see between the two sets of plants.
Look at the pictures of the young maize (corn) plants. The plants on the left have been given light, but the ones on the right have not had light. You may also be able to look at some actual plants that have been grown in the light and in the dark. Suggest what has caused these differences.
Work in a team. In two minutes, write down as many words as you can think of that start with ‘photo’. The winning team is the one which has thought of the most words – but only if they are all real words, and are spelt correctly. What does each word have to do with light?
Collecting the gas produced in photosynthesis
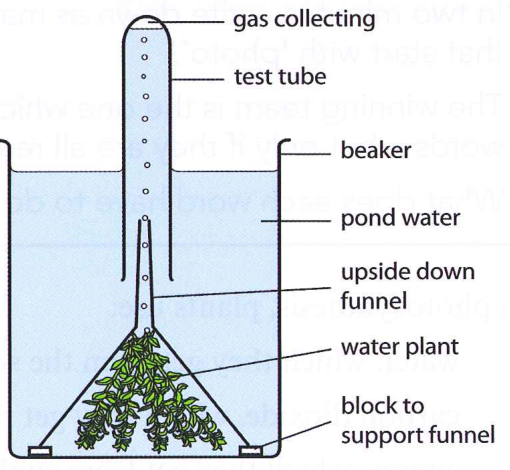
You are going to use a plant that grows in water for this experiment. This makes it easy to collect the gas that it releases.
You will need: the apparatus shown in the diagram.
If you do not have any pond water, you can use ordinary tap water. You can use any plant that grows under water. You can often buy water plants in pet shops, because people like to put them into tanks with their pet fish.
Method
1 Set up the apparatus shown in the diagram.
2 Put the apparatus in a place where the water plant will get sunlight. Leave it for at least one day.
3 When plenty of gas has collected in the top of the test tube, put your hand into the beaker of water. Carefully remove the tube from the top of the funnel. Keep the opening of the tube under the water, or the gas will escape!
4 With the tube still upside down, put your thumb over the end of the tube, to keep the water and gas inside.
5 Take the tube out of the water, keeping your thumb over the end. Keep the tube upside down.
6 Very carefully, move your thumb just a little bit, so that the water runs out of the tube but the gas stays inside. Push a stopper into the tube, then place it – right way up – in a test tube rack.
7 Light a splint, and then blow it out so that it is glowing but not burning.
8 Test the gas with the glowing splint. (Try not to touch the wet sides of the test tube, or the splint will be extinguished!) If the gas contains a lot of oxygen, the splint will relight.
Investigating how light intensity affects the rate of photosynthesis
Like the previous experiment, this experiment uses a water plant. You are going to change the amount of light that falls onto the plant and see how this affects the number of bubbles it produces in one minute.
You will need: a test tube containing water, a piece of water plant, a lamp, a beaker in which you can stand the test tube, a ruler for measuring the distance between the lamp and the test tube, a timer.
Safety: It is very important to keep electrical wires, plugs and the lamp away from the water.
Method
1 Set up your equipment. Place the lamp close to the test tube. Leave the equipment like that for about 5 minutes, to give the plant time to settle down and start to photosynthesise. While you are waiting, read the rest of these instructions and then draw a results chart. When you can see bubbles coming from the cut end of the plant stem, you can start your experiment.
2 Measure the distance between the lamp and the test tube, and write it down in your results chart.
3 Start the timer. Count how many bubbles the plant produces in one minute, and write this down.
4 Repeat step 3 two more times.
5 Now move the lamp a little bit further away from the test tube. Measure the new distance.
6 Repeats steps 3 and 4.
7 Repeat steps 5 and 6 for at least two more distances of the lamp, further from the test tube.
Plot a graph of your results.
- Put distance of lamp from the test tube on the x-axis. Remember to include units.
- Put mean number of bubbles per minute on the y-axis.
- Plot your points as small, neat crosses.
- Draw a line to show the trend in your results.
Light intensity means the amount of light. Copy and complete this sentence: As the distance of the lamp from the test tube increases, the light intensity …
In Stage 8, you learnt about respiration. Think about each of these questions on your own. Then turn and discuss them with your partner. What similarities are there between photosynthesis and respiration? Now share your ideas with the rest of the class.
In Stage 8, you learnt about respiration. Think about each of these questions on your own. Then turn and discuss them with your partner. What differences are there between photosynthesis and respiration? Now share your ideas with the rest of the class.