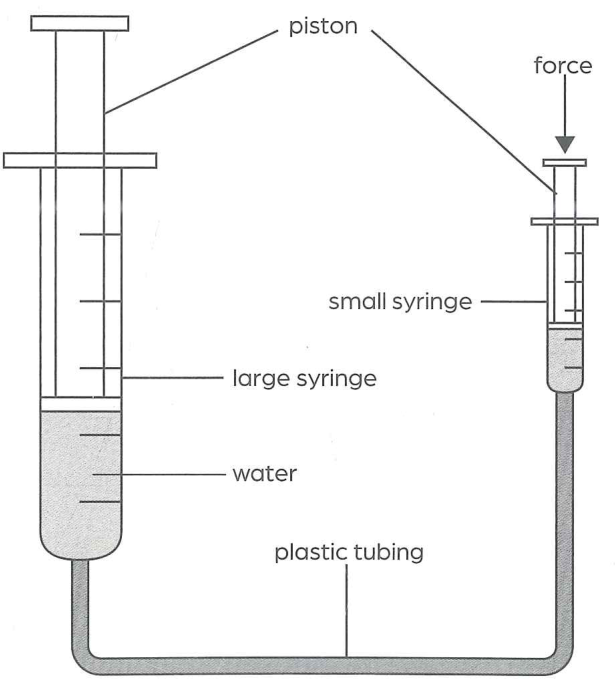
Work in pairs and wear safety goggles. Connect a small syringe and a large syringe with plastic tubing. Half-fill the large syringe with water; fill the small syringe and tubing with water. One person slowly pushes the small piston while the other holds the large syringe. Then push the large piston so water returns to the small syringe. Swap syringes and compare how they feel.
Use the markings on the syringes to measure how much each piston moves when a force is applied.
Work in pairs and wear safety goggles. Connect a small syringe and a large syringe with plastic tubing. Half-fill the large syringe with water; fill the small syringe and tubing with water. One person slowly pushes the small piston while the other holds the large syringe. Then push the large piston so water returns to the small syringe. Swap syringes and compare how they feel.
Work in pairs and wear safety goggles. Connect a small syringe and a large syringe with plastic tubing. Half-fill the large syringe with water; fill the small syringe and tubing with water. One person slowly pushes the small piston while the other holds the large syringe. Then push the large piston so water returns to the small syringe. Swap syringes and compare how they feel.
Work in pairs and wear safety goggles. Connect a small syringe and a large syringe with plastic tubing. Half-fill the large syringe with water; fill the small syringe and tubing with water. One person slowly pushes the small piston while the other holds the large syringe. Then push the large piston so water returns to the small syringe. Swap syringes and compare how they feel.
Is there any connection between the size of the syringes and the distances the pistons moved? Give a reason for your answer.
Work in pairs and wear safety goggles. Connect a small syringe and a large syringe with plastic tubing. Half-fill the large syringe with water; fill the small syringe and tubing with water. One person slowly pushes the small piston while the other holds the large syringe. Then push the large piston so water returns to the small syringe. Swap syringes and compare how they feel.
The small syringe has a cross-sectional area of 0.5 cm² and a force of 20 N was applied to the piston. Calculate the pressure that was applied to the large syringe.
Work in pairs and wear safety goggles. Connect a small syringe and a large syringe with plastic tubing. Half-fill the large syringe with water; fill the small syringe and tubing with water. One person slowly pushes the small piston while the other holds the large syringe. Then push the large piston so water returns to the small syringe. Swap syringes and compare how they feel.
The area of the large syringe is 5 cm². The pressure applied to it is the same as the pressure you calculated in step 13. What is the force on the large piston?
In step 13, a force of 20 N acts on a small piston of area 0.5 cm².
Work in pairs and wear safety goggles. Connect a small syringe and a large syringe with plastic tubing. Half-fill the large syringe with water; fill the small syringe and tubing with water. One person slowly pushes the small piston while the other holds the large syringe. Then push the large piston so water returns to the small syringe. Swap syringes and compare how they feel.
Given that the pressures in both pistons are the same, what can we conclude about the area of the syringes and the force that was applied?
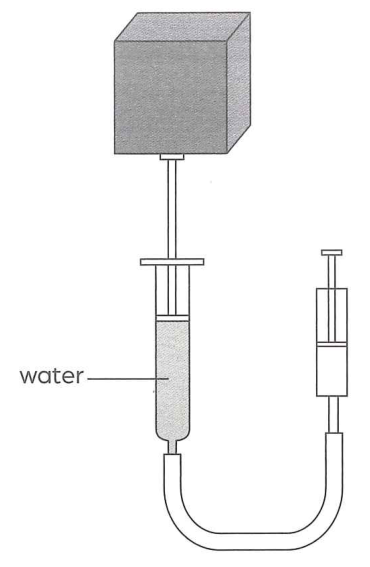
Wear safety goggles. Connect two transparent syringes of the same size with plastic tubing, without gaps. Partly fill one syringe with water, remove air bubbles, and leave a space between its piston and the water. Raise the empty syringe's piston to leave space inside. Hold both outlets downwards, with the water-filled syringe lower than the empty one. Press the empty syringe's piston down slowly and steadily. Observe the other piston. Place a lightweight object on the water-filled syringe's piston and continue pressing.
What happened to the water-filled syringe when you pressed down on the empty syringe's piston? Give a reason for your answer.
Wear safety goggles. Connect two transparent syringes of the same size with plastic tubing, without gaps. Partly fill one syringe with water, remove air bubbles, and leave a space between its piston and the water. Raise the empty syringe's piston to leave space inside. Hold both outlets downwards, with the water-filled syringe lower than the empty one. Press the empty syringe's piston down slowly and steadily. Observe the other piston. Place a lightweight object on the water-filled syringe's piston and continue pressing.
Describe how the object placed on top of the water-filled syringe moved as you applied pressure to the empty syringe. Explain your answer.
Wear safety goggles. Connect two transparent syringes of the same size with plastic tubing, without gaps. Partly fill one syringe with water, remove air bubbles, and leave a space between its piston and the water. Raise the empty syringe's piston to leave space inside. Hold both outlets downwards, with the water-filled syringe lower than the empty one. Press the empty syringe's piston down slowly and steadily. Observe the other piston. Place a lightweight object on the water-filled syringe's piston and continue pressing.
Why was it possible to lift the object when pressure was applied to the empty syringe?
Wear safety goggles. Connect two transparent syringes of the same size with plastic tubing, without gaps. Partly fill one syringe with water, remove air bubbles, and leave a space between its piston and the water. Raise the empty syringe's piston to leave space inside. Hold both outlets downwards, with the water-filled syringe lower than the empty one. Press the empty syringe's piston down slowly and steadily. Observe the other piston. Place a lightweight object on the water-filled syringe's piston and continue pressing.
Wear safety goggles. Connect two transparent syringes of the same size with plastic tubing, without gaps. Partly fill one syringe with water, remove air bubbles, and leave a space between its piston and the water. Raise the empty syringe's piston to leave space inside. Hold both outlets downwards, with the water-filled syringe lower than the empty one. Press the empty syringe's piston down slowly and steadily. Observe the other piston. Place a lightweight object on the water-filled syringe's piston and continue pressing.
Predict what would happen if you tried lifting a larger or smaller object in this investigation.
In this teacher demonstration, students wear safety goggles. The teacher fills a bowl and an open aluminium can with ice water, heats the can until its water boils, then uses tongs to quickly put the can upside down into the ice water. Take extra care with the heat source. What happened to the heated aluminium can when it was put into the ice water?
In this teacher demonstration, students wear safety goggles. The teacher fills a bowl and an open aluminium can with ice water, heats the can until its water boils, then uses tongs to quickly put the can upside down into the ice water. Take extra care with the heat source. Explain what happened to the pressure inside the can when it was heated.
In this teacher demonstration, students wear safety goggles. The teacher fills a bowl and an open aluminium can with ice water, heats the can until its water boils, then uses tongs to quickly put the can upside down into the ice water. Take extra care with the heat source. Why was the can quickly put into the ice water after it was heated?
In this teacher demonstration, students wear safety goggles. The teacher fills a bowl and an open aluminium can with ice water, heats the can until its water boils, then uses tongs to quickly put the can upside down into the ice water. Take extra care with the heat source. What caused the can to collapse when it was put into the ice water?
In this teacher demonstration, students wear safety goggles. The teacher fills a bowl and an open aluminium can with ice water, heats the can until its water boils, then uses tongs to quickly put the can upside down into the ice water. Take extra care with the heat source. How does this investigation demonstrate the concept of gas pressure?
In this teacher demonstration, students wear safety goggles. The teacher fills a bowl and an open aluminium can with ice water, heats the can until its water boils, then uses tongs to quickly put the can upside down into the ice water. Take extra care with the heat source. Name three factors that affect how the can could be crushed.
In this teacher demonstration, students wear safety goggles. The teacher fills a bowl and an open aluminium can with ice water, heats the can until its water boils, then uses tongs to quickly put the can upside down into the ice water. Take extra care with the heat source. How does this investigation relate to real-world applications of gas pressure?
Fill a large glass container with tap water. Add one or two drops of food colouring with a dropper. Do not stir; let the liquids mix on their own. Record the time you add the colouring to the water. Record the time the colour completely spread throughout the water.